How to Create macOS Ventura 13 ISO Image (VirtualBox & VMware)
How to Create macOS Ventura 13 ISO Image (VirtualBox & VMware)
macOS Ventura is one of the biggest operating systems of Apple Inc launched on June 6, 2022, in the market. macOS Ventura version 13 is the successful major release of macOS Monterey. That includes bunches of new and best features. macOS Ventura the latest update of the Apple macOS operating system, that introduces a multitasking experience and overhauls multiple apps. Also, added several updates to the capabilities of the platform.
The current version of macOS Ventura version 13 is 13.2.1 which was released in February 2023. The minor updates of macOS Ventura 13.2.1 didn’t bring any changes to the features, but the security and performance, and significant bugs are fixed. There is an important inside the Safar WebKit browser engine a vulnerability that may have been exploited.
Also, the latest update of macOS Ventura is on the way which is called macOS Ventura version 13.3. The latest update of macOS Ventura includes new emoji character that includes a shaking head, pink heart, blue heart, gray heart, donkey, moose, blackbird, goose, wing, jellyfish, hyacinth, pea pod, ginger, fan, comb, flute, and other emoji’s in macOS Ventura new update.
How to Create macOS Ventura 13 ISO Image (VirtualBox & VMware)
However, if you want to install macOS Ventura on your Windows PC, then there is the best method called virtualization technology. The virtualization technology inside macOS, Windows, and Linux, is available which allows you to run several operating systems on one machine. If you are using Windows PC, and don’t have access to a macOS computer. Then simply you can use your Windows PC, a virtual machine to install the macOS operating system in it.
So, to install the macOS operating system on your Windows PC, firstly you need the Virtual Machine Software. As there are two most popular virtual machines called VirtualBox and VMware Workstation. Both of them are working pretty nicely on Windows PC. VirtualBox is an open-source machine, and VMware is a paid Virtual Machine that cost up to $100 per year. And the second thing is you need to have the macOS operating system ISO image file or its VMDK file that allows you to install it on Virtual Machines.
In addition through this article, I will guide you step-by-step to create macOS Ventura’s latest version ISO image file with screenshots and step guide.
What is macOS Ventura ISO Image File?
In order to know the ISO Installer file of macOS Ventura, firstly you need to know the ISO image file meaning. The ISO image file contains the original file that is available on the actual physical disk. Through the ISO file, you can store a large amount of the file into a single file called an ISO image file, in place of the physical DVD.
Actually, we are calling the ISO image file a copy of the original file that contains the optical disk file. And also, the ISO image file is used usually for operating systems files these days. And the macOS Ventura installer file is also will contain a single ISO file all the files and folders should be available in a single file. Also, the ISO image file can be run on VirtualBox and VMware. Also, you can create a Bootable USB drive from any ISO image file which contains the operating system.
Steps to Create macOS Ventura ISO Image File
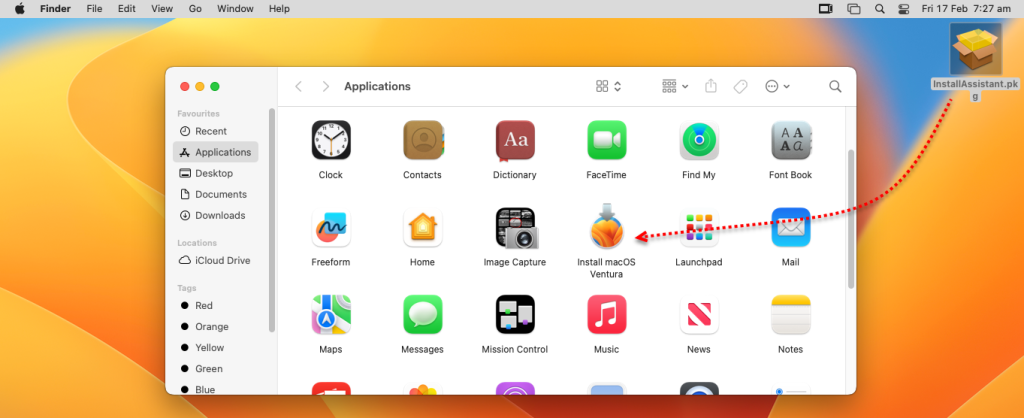
There are many ways to get the ISO image file of macOS Ventura, but one of the easiest ways to is to navigate to the Apple Store and search there for macOS Ventura’s latest update. Once the update appeared you can Get the update on your macOS actual PC. And the next method is you can get the macOS Ventura software update file by installing the InstallerAssistant.Pkg file. So, when the software update is available in the application folder of your Mac there you will be able to create the macOS Ventura ISO image file.
After installing the macOS Ventura installerassistant.pkg on your actual Mac, the “Install macOS Ventura” software will appear in the applications folder of your Mac, like the below down screenshot.
Now you have to navigate to the search spotlight and open up the terminal.

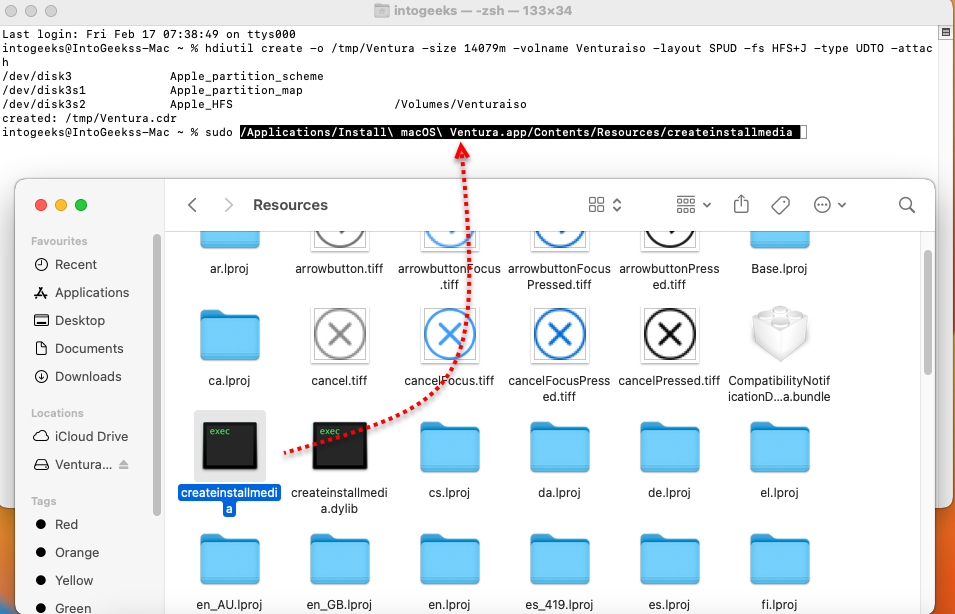
When the terminal window opened at the first step type the below down commands, then hit enter. To proceed to the next you have to enter the password and hit enter.
hdiutil create -o /tmp/Ventura -size 14079m -volname Venturaiso -layout SPUD -fs HFS+J -type UDTO -attach
Also, there are a few steps that are important to know for creating a macOS Ventura ISO image file.
- Size: You can change the size of the volume to match macOS Ventura, Usually, the macOS Ventura latest version is at least 14GB.
- Volume name: The volume name is macOS Ventura.iso. So, if you don’t face any kind of error during the creation, so apply the commands properly.
- Layout SPUD: Single Partition, Apple Partition Map.
- -fs HFS+: File system options, Mac OS Extended is the file system of macOS Drive.
- Type: UDTO – DVD/CD master is the file for the ISO file.
- Attach: This means that this volume will be mounted to the macOS as soon as it is created.
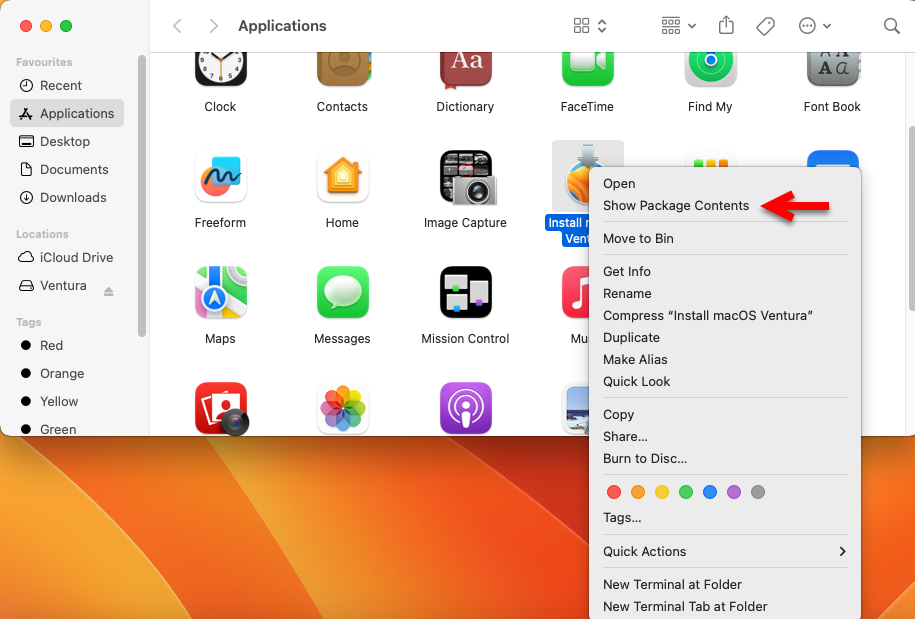
After you have applied the first command then apply the second command by following the screenshots also. Now type the Sudo command, then navigate to Applications>Right-click on Install macOS Ventura>Show Package Content.
On the contents of macOS Ventura, simply go to the resources folder>Drag & drop>createinstallmedia file> into the terminal window.
Now once you dragged and doped the macOS Ventura installer file into the terminal simply apply the below down commands and hit enter.
--volume /Volumes/Venturaiso --nointeractionNote: Be sure that the second command should be like the below-down commands.
sudo /Applications/Install\ macOS\ Ventura.app/Contents/Resources/createinstallmedia --volume /Volumes/Venturaiso --nointeractionApple the second command to unmount the macOS Ventura Volume.
hdiutil detach -force /Volumes/Install\ macOS\ VenturaMove the macOS Ventura file to the desktop and rename .cdr to .ISO file.
mv /tmp/Ventura.cdr ~/Desktop/Ventura.isoAlso Read:
- How to Install macOS Ventura 13 on VMware on Windows PC?
- How to Install macOS Ventura 13 on VirtualBox on Windows PC?
Conclusion
So, the creation of the macOS Ventura ISO image file will take some time, wait for it until it should be completed. When the macOS Ventura file is created. Simply copy the ISO image file to a USB drive and install it on your Windows PC, through VirtualBox or VMware.


2 Comments