How to Install macOS Big Sur Final on VMware on Windows PC?
How to Install macOS Big Sur Final on VMware on Windows PC?
macOS Big Sur is the latest operating system released by Apple for their Mac computers, first introduced in June 2020. It is the successor to macOS Catalina and features several new updates and improvements, including a redesigned user interface, enhanced privacy features, and improved compatibility with iOS devices. One of the most notable changes in Big Sur is the redesigned user interface. The icons, menus, and windows have been updated with a fresh and modern look, with translucent backgrounds and rounded corners. The Dock has also been updated with a new design and features, such as the ability to see recently used apps.
Another critical feature of macOS Big Sur is its improved privacy protection. It now requires apps to ask for permission before accessing sensitive information, such as your location, camera, or microphone. Additionally, Safari has been updated with new privacy features, including a Privacy Report that shows which trackers have been blocked.
Regarding compatibility, Big Sur is designed to work seamlessly with Apple’s other devices. It supports new features like Continuity, which allows you to use your iPad or iPhone as a second display or input device for your Mac. It also includes support for Universal apps, which run natively on both Macs with Apple silicon and Intel-based Macs.
Other new features in macOS Big Sur include enhancements to Messages and Maps, improvements to the Photos app, and new widgets to the Notification Center. Additionally, the Control Center has been redesigned and now includes quick access to commonly used settings and controls. Overall, macOS Big Sur is a significant update to Apple’s operating system, offering users a more modern and streamlined experience while also improving privacy and compatibility with other Apple devices.
Also, macOS Big Sur is compatible with the following MacBook Machines:
- iMac (Mid 2014 or later)
- iMac Pro
- MacBook (Early 2015 or later)
- MacBook Air (Mid 2013 or later)
- MacBook Pro (Late 2013 or later)
- Mac Mini (Late 2014 or later)
- Mac Pro (Late 2013 or later)
- Developer Transition Kit (only up to Big Sur 11.3 beta
By using the patch tools you can install macOS Big Sur on the earlier Mac that doesn’t supports it. Such as iMac 2012, and MacBook Pro 2012. Using the patch tools you can install macOS Big Sur on the old version of MacBook Pro 2008, and iMac Minin 2009.
How to Install macOS Big Sur Final on VMware on Windows PC?
To install macOS Big Sur on VMware on Windows PC, first, you need to download and install some required files. Such as downloading and installing the VMware Workstation Pro 17/Player on your Windows PC. Download the macOS Big Sur ISO image or VMDK file.
- Download the macOS Big Sur ISO image file
- Download the macOS Big Sur VMDK file
- Download & Install VMware Workstation on your Windows PC
- Edit the macOS VMX file
- Start installing macOS, Big Sur
- Complete the basic settings of macOS Big Sur on VMware
- Install the VMware tools (Full-screen mode, Drag & Drop)
What is VMware?
VMware is an open-source platforms virtualization software application for Windows, Linux, and macOS. VMware is one of the advanced virtualization software that allows you to test several and multiple operating systems at the same time on a single physical machine. For example, you can install Windows, macOS, Windows, Linux, & Android OS on VMware on your Windows PC. So, VMware Workstation comes with two different versions, such as VMware Workstation/Player. If you want to test the VMware Workstation Pro on your Windows PC, then you have to purchase it. And if you want to use the VMware Player, it’s completely free of cost. So, there are differences between Workstations and Players. As the VMware Workstation comes with full features, and VMware Player features are limited.
And currently, the latest version of VMware Workstation is VMware Pro 17, the VMware Workstation Pro 17 features are excluded more than VMware Workstation Pro 16. And here is the free version in the below down guide.
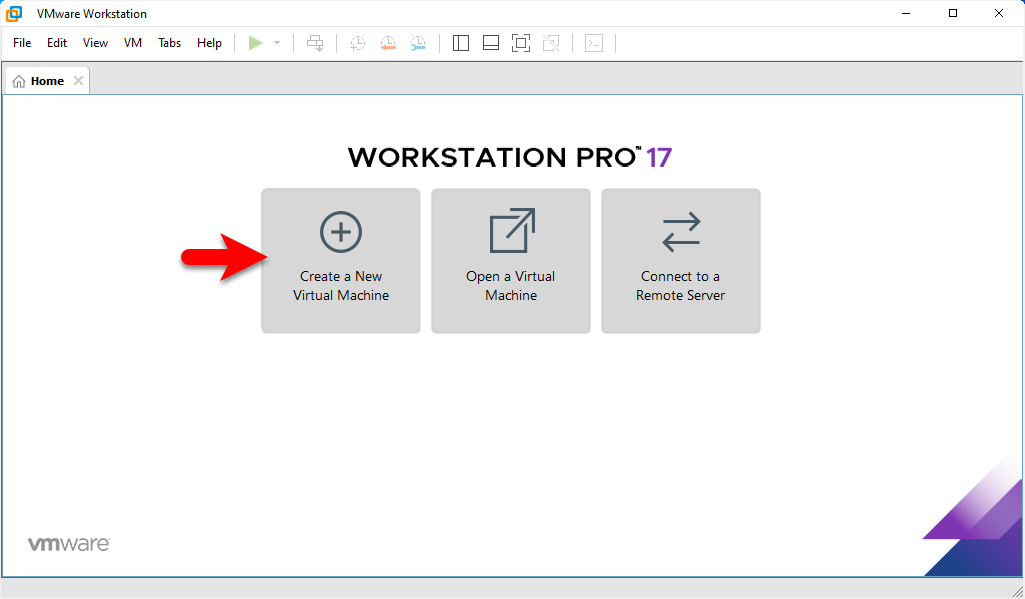
Create A New Virtual Machine on VMware on Windows PC For macOS Big Sur
To create a new virtual machine for macOS Big Sur on VMware on Windows PC, simply open up the VMware Workstation on the first window and click on create a new virtual machine.
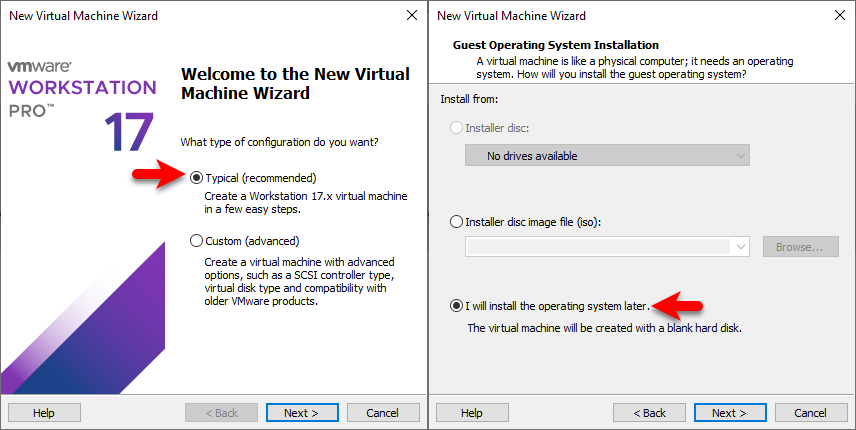
When this window opened select the typical recommended then click next, Select the option “I will install the operating system later” and click next.
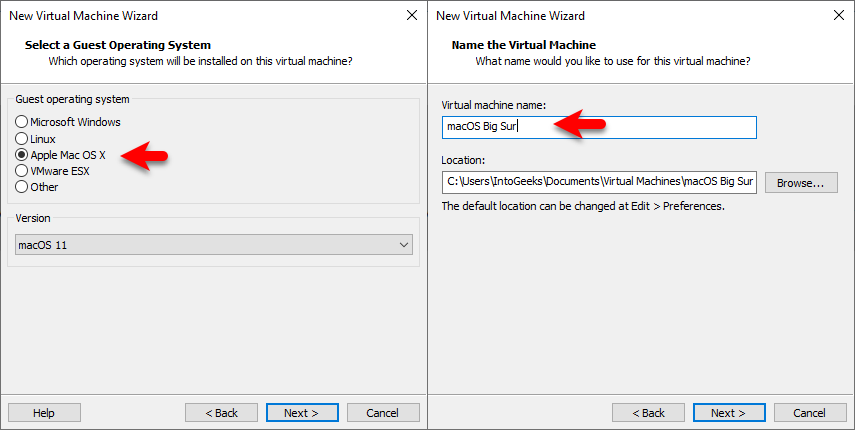
Select the guest operating system, Mac OS X, and version macOS 11 then click next. Type the name of the virtual machine, then specify the location, and click next.
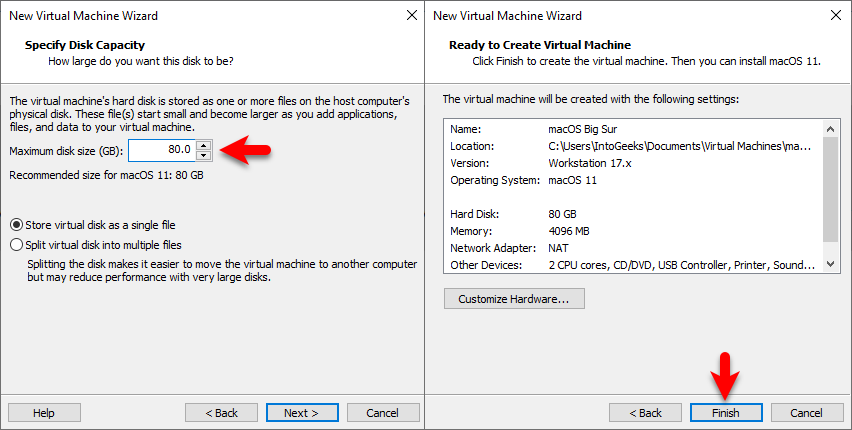
Select the maximum disk size for macOS Big Sur, then select “Store virtual disk a single file” and click next. Now you are ready to create the virtual machine so click finish to finalize.
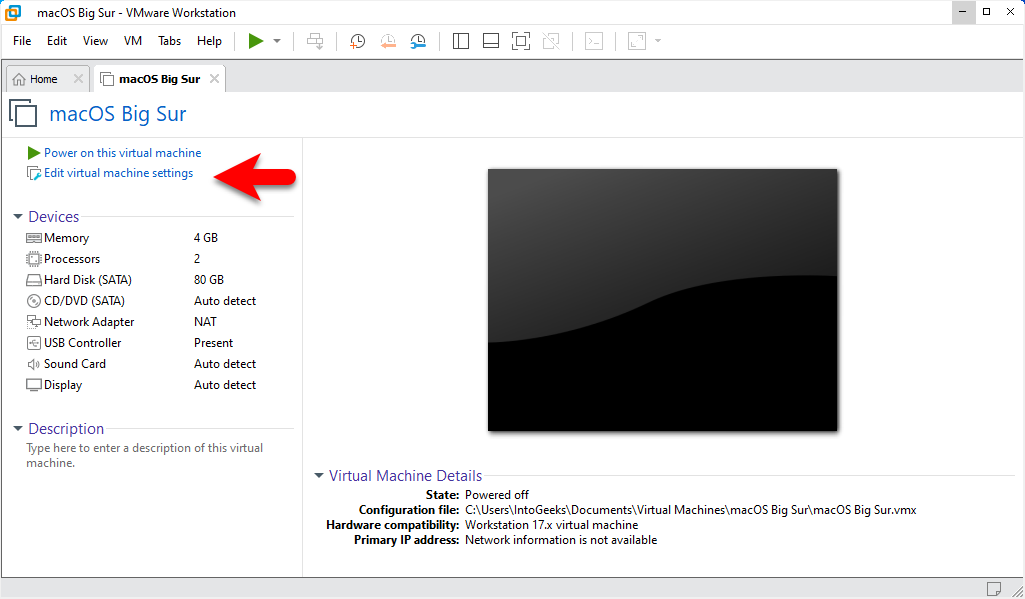
Edit the macOS Big Sur Virtual Machine Settings
Once you have created the macOS Big Sur Virtual Machine on VMware on Windows PC. So, there are a few settings to edit for better performance, simply select the virtual machine and click on Edit virtual machine settings.
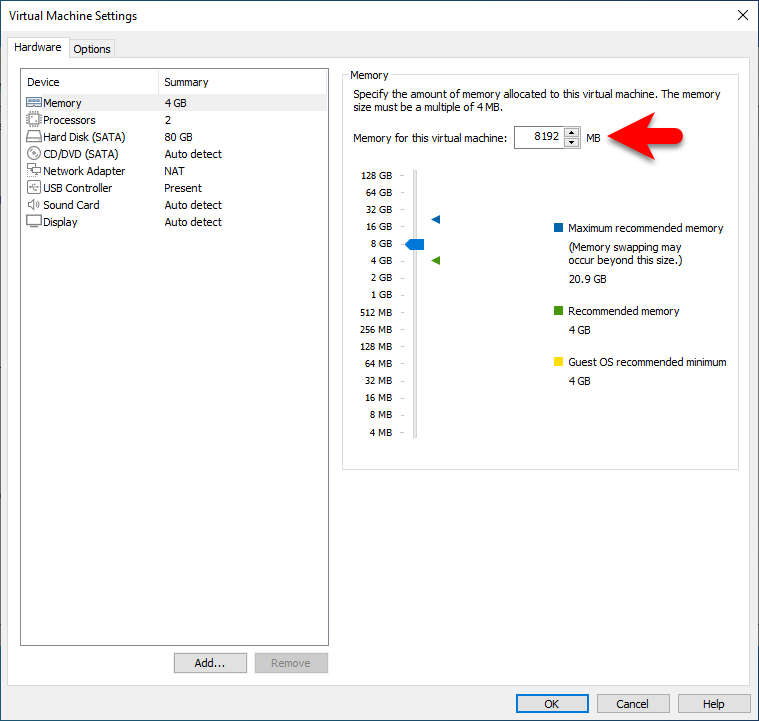
When the settings window opened, on the first step, from the left-handed window side select the hardware tab. Then select the Memory tab, and increase the memory size.
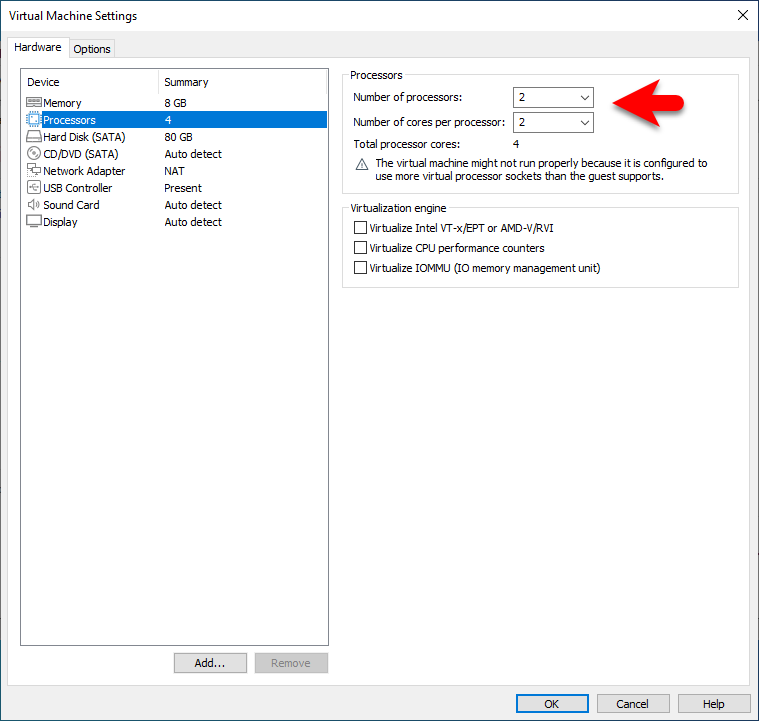
Select the processor tab, and increase the number of processors.
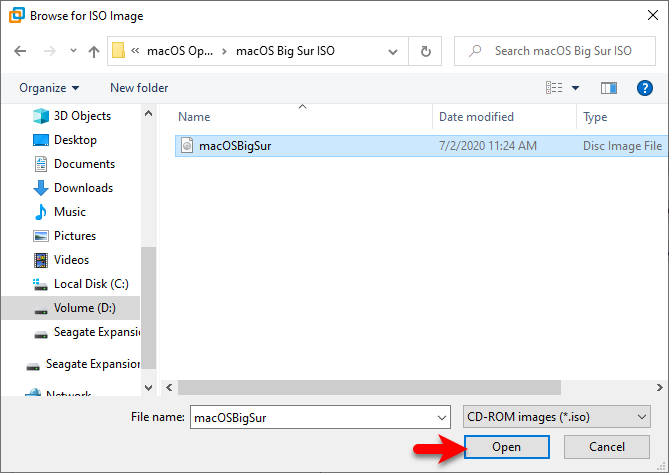
Select the CD/DVD SATA tab, then select the Use ISO image file option, and click on browse.
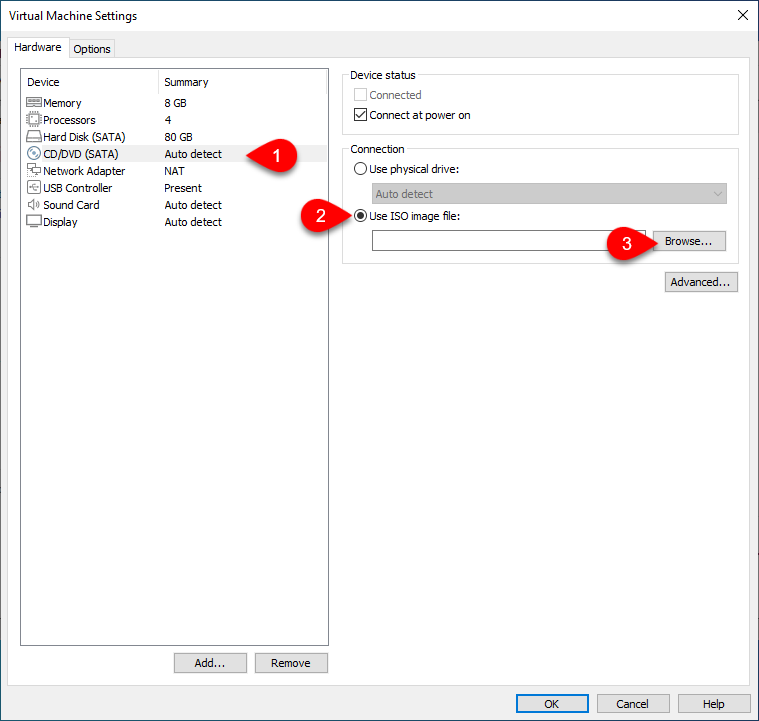
Now select the macOS Big Sur ISO Image file and click open.
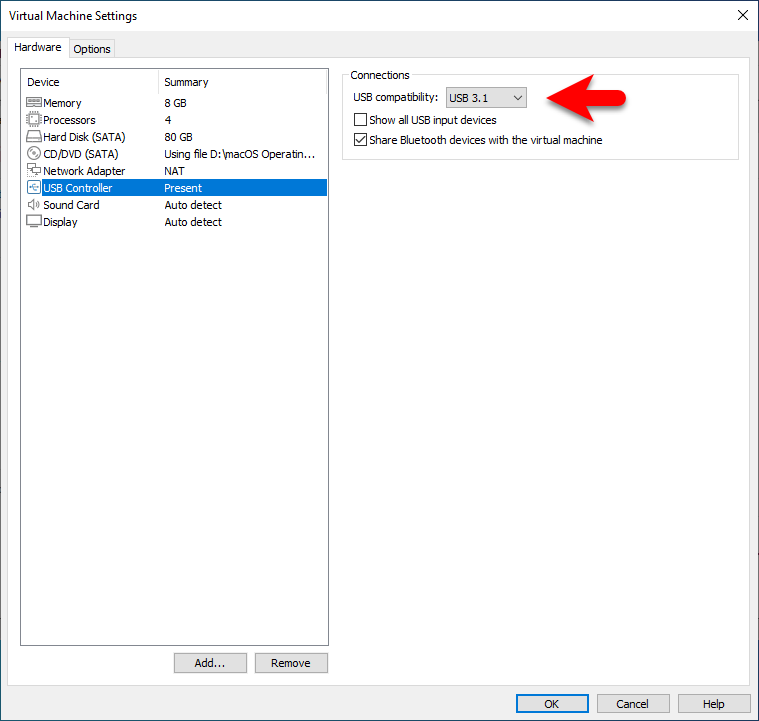
Choose the USB Controller tab, then select USB 3.1 and click on OK to save the changes.
Edit the VMX file of macOS Big Sur
You might see lots of changes to the vmx file of other macOS, and macOS Big Sur. Don’t worry there are some extra commands which configure the macOS Big Sur vmx file on VMware on Windows PC. So, to edit the macOS Big Sur vmx file simply close the VMware Workstation.
Now go to the virtual machines folder, find the macOS Big Sur Virtual Machine, right-click on vmx file>and open with notepad.
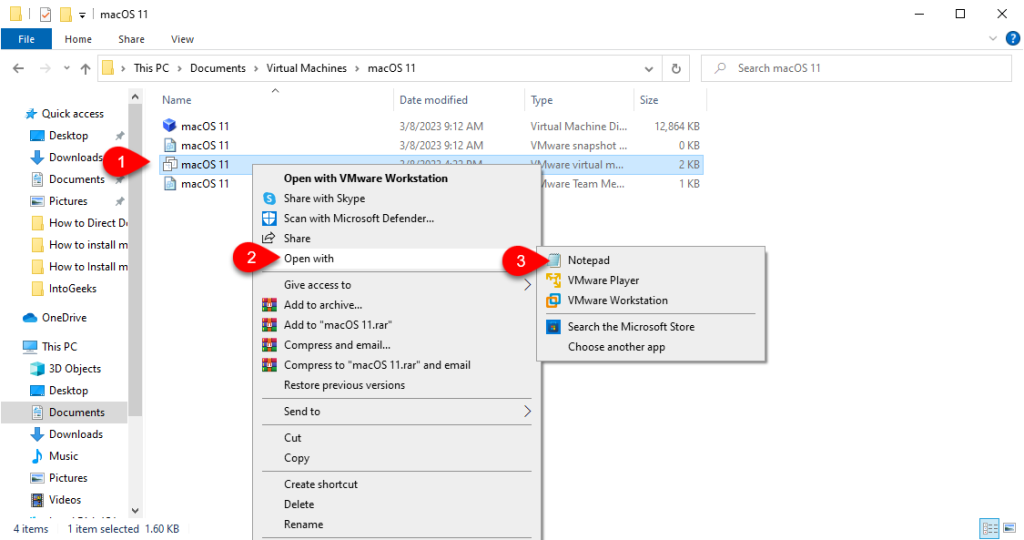
Once the vmx file is opened, scroll down copy and paste the below down commands, and press and hold ctrl+s to save changes.
smbios.reflectHost = "TRUE"
hw.model = "MacBookPro14,3"
board-id = "Mac-551B86E5744E2388"
smc.version = "0"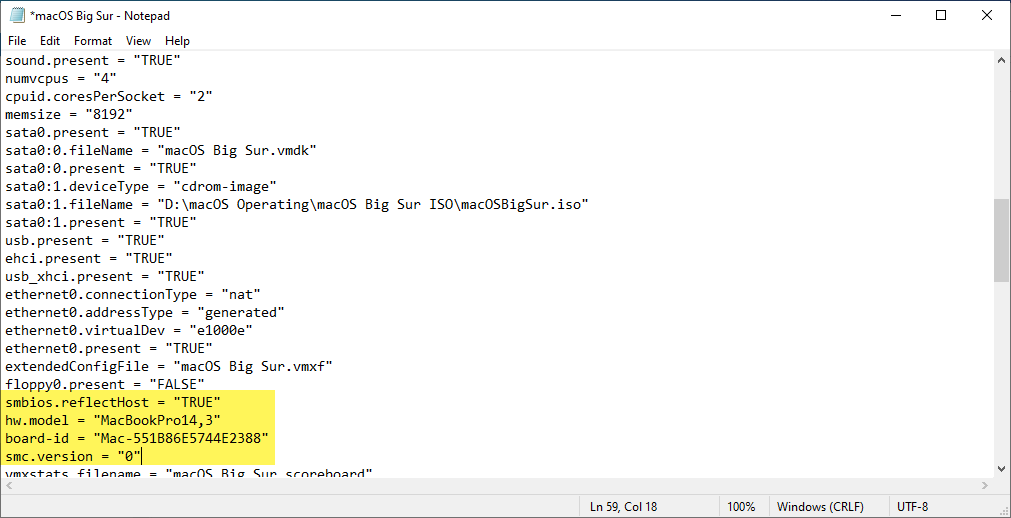
Perform a Clean Install of macOS Big Sur on VMware on Windows PC
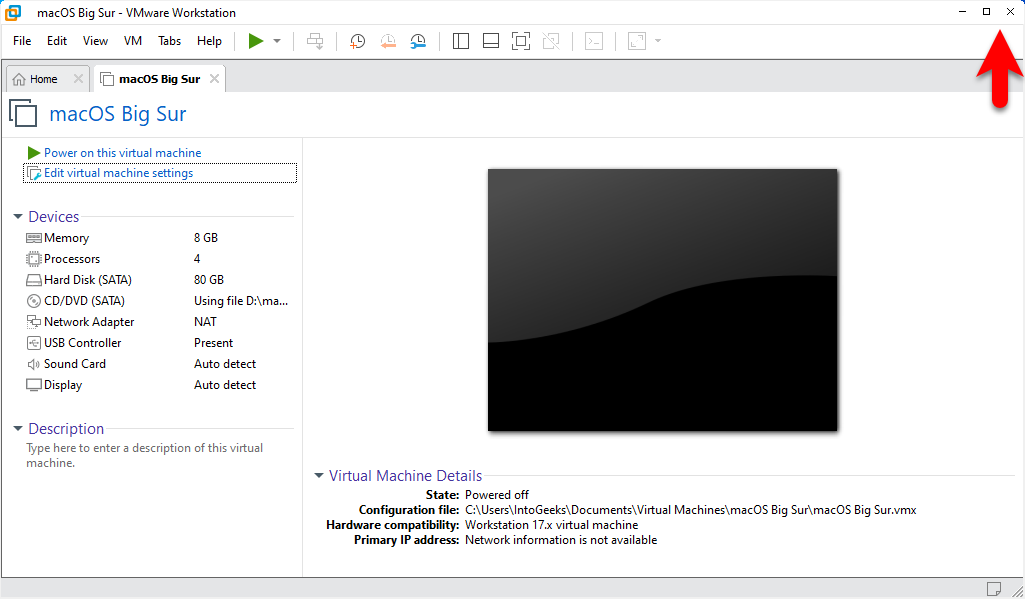
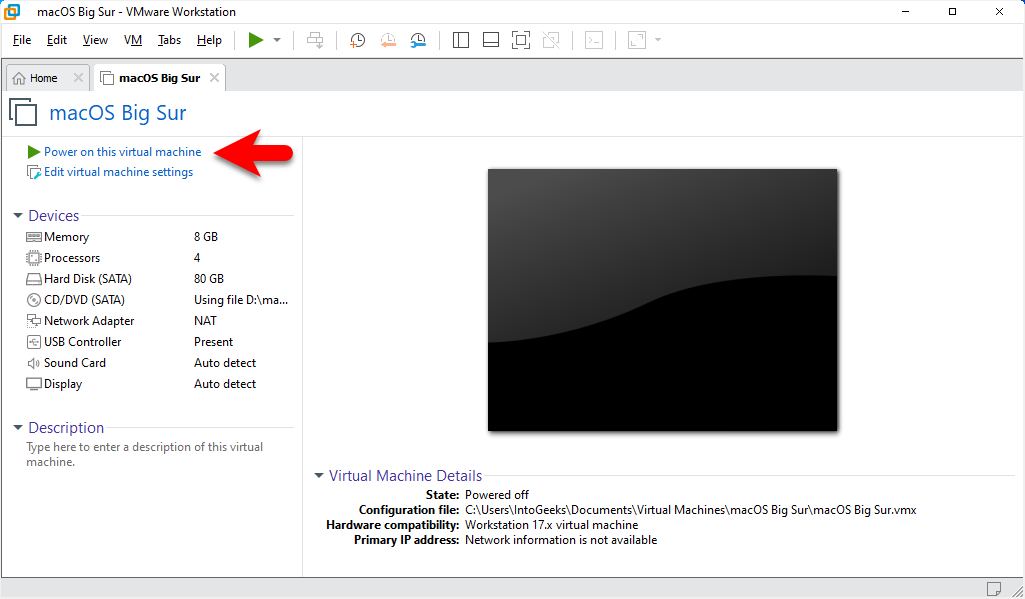
Once the virtual machine is successfully created for macOS Big Sur on VMware on Windows. And the vmx files are configured, so now it’s time to install macOS Big Sur on VMware on Windows PC. Simply, navigate to VMware Workstation and open then click on “Power on this virtual machine” to start installing macOS, Big Sur.
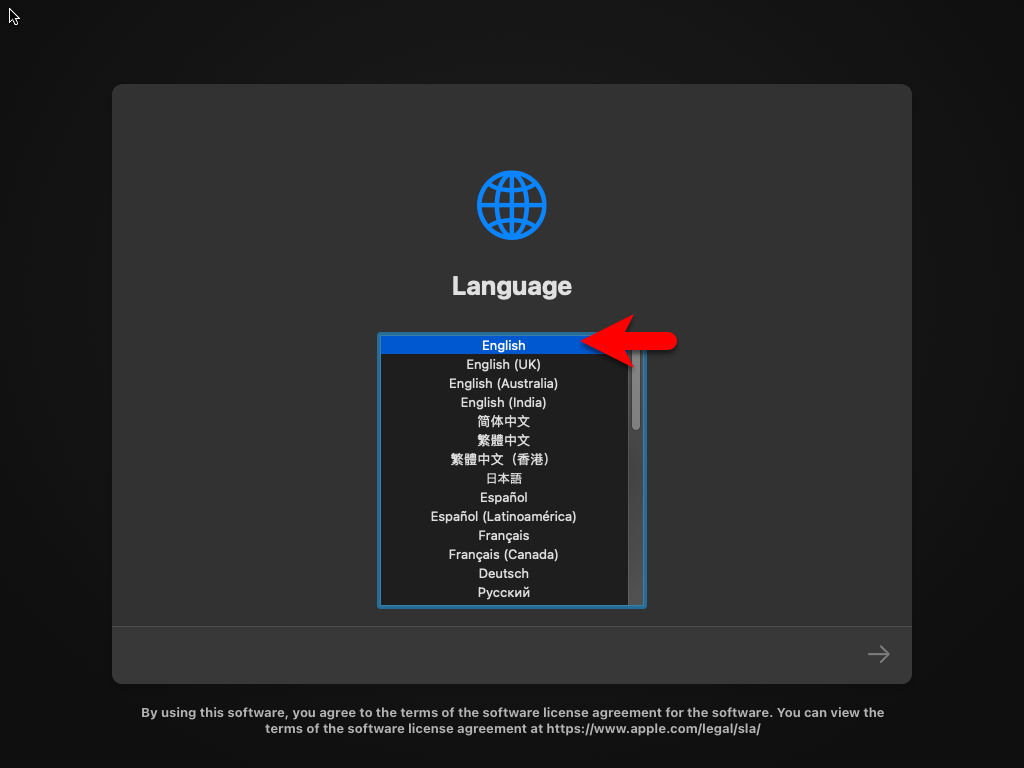
When the installation is launched on the first window select your language and click on the arrow option.
On the recovery window, selects the disk utility and click continue.

From the left-handed window side, select the VMware Virtual Sata option, then click on erase option. And format the disk with the following parameters.
- Name optional
- Format Mac OS X Extended (journaled)
- Scheme GUID Partition Map
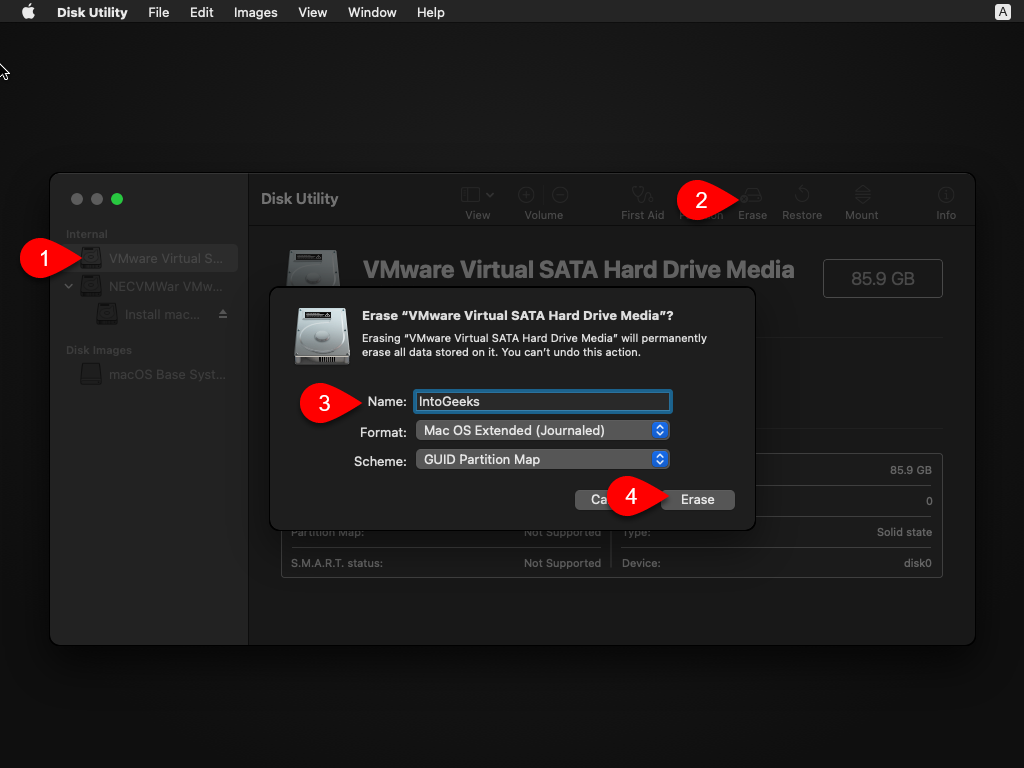
Once the disk is formatted simply click on the done option.
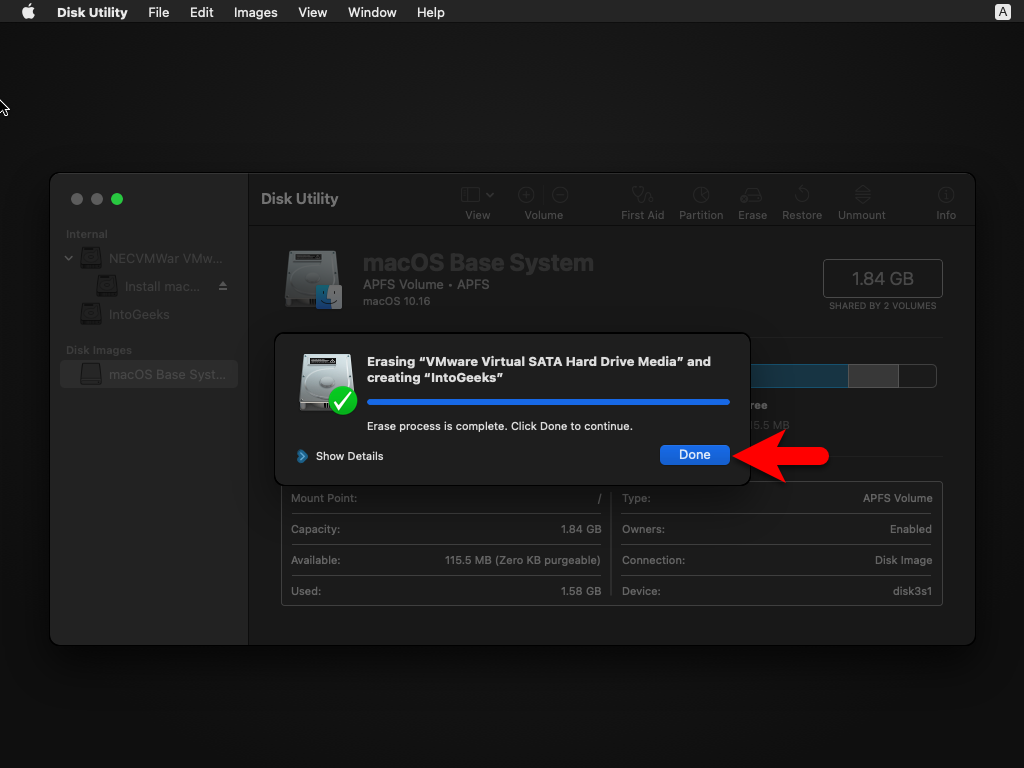
Now simply close the disk utility window.

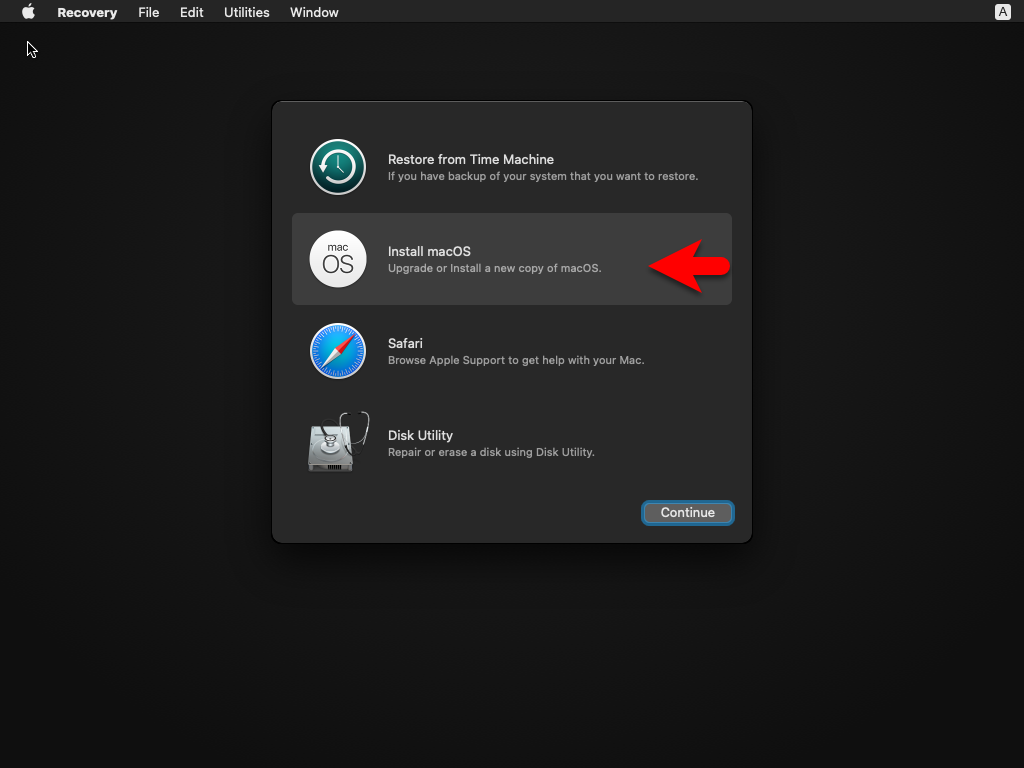
Now again on the recovery window, select the “Instal macOS” option and click continue.
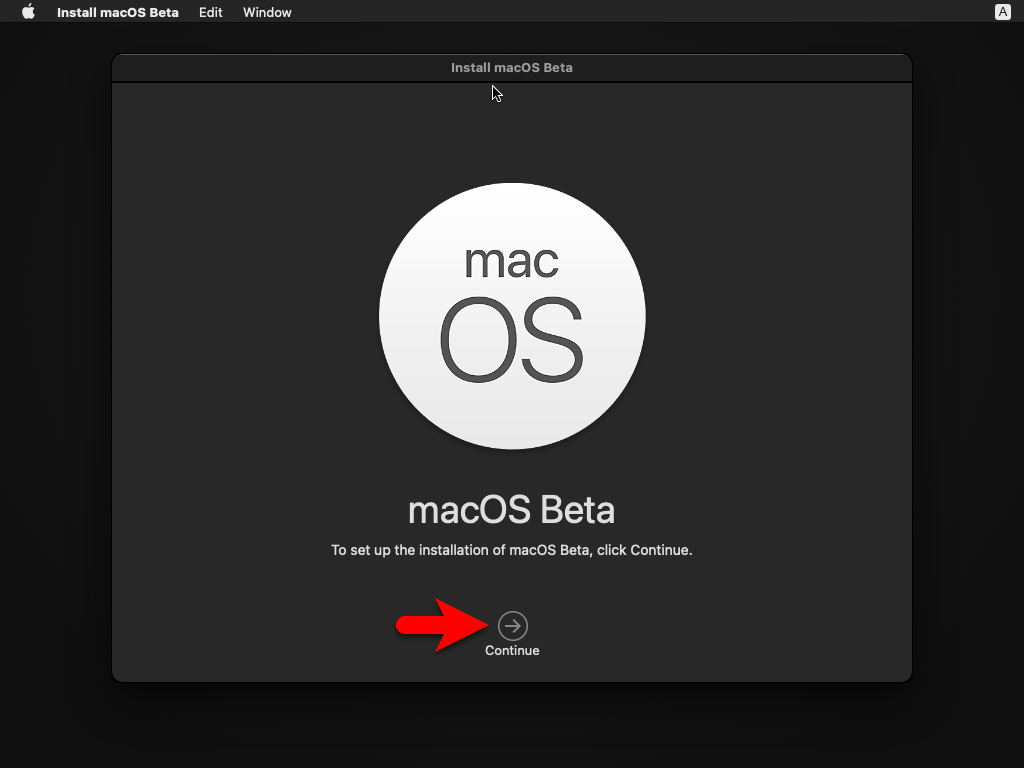
To set up the installation of macOS Big Sur on VMware simply click continue.
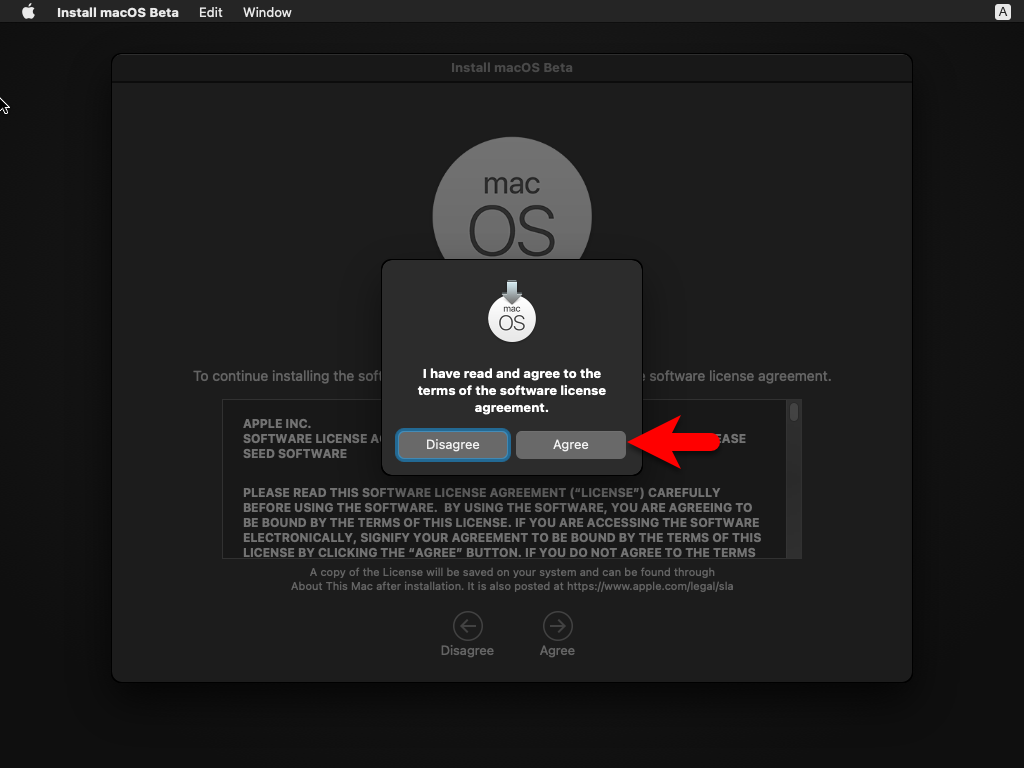
Agree with the terms and conditions of macOS Big Sur.
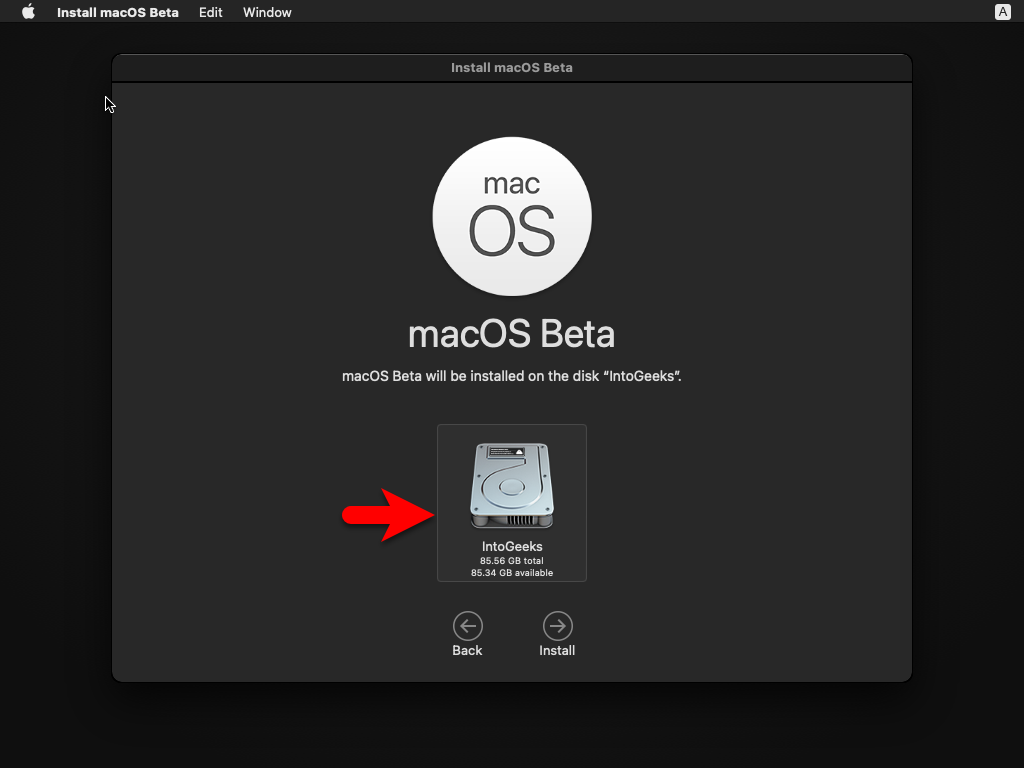
Select the disk where you want to install macOS Big Sur on it, as this disk is formatted in the previous step on the Disk Utility window.
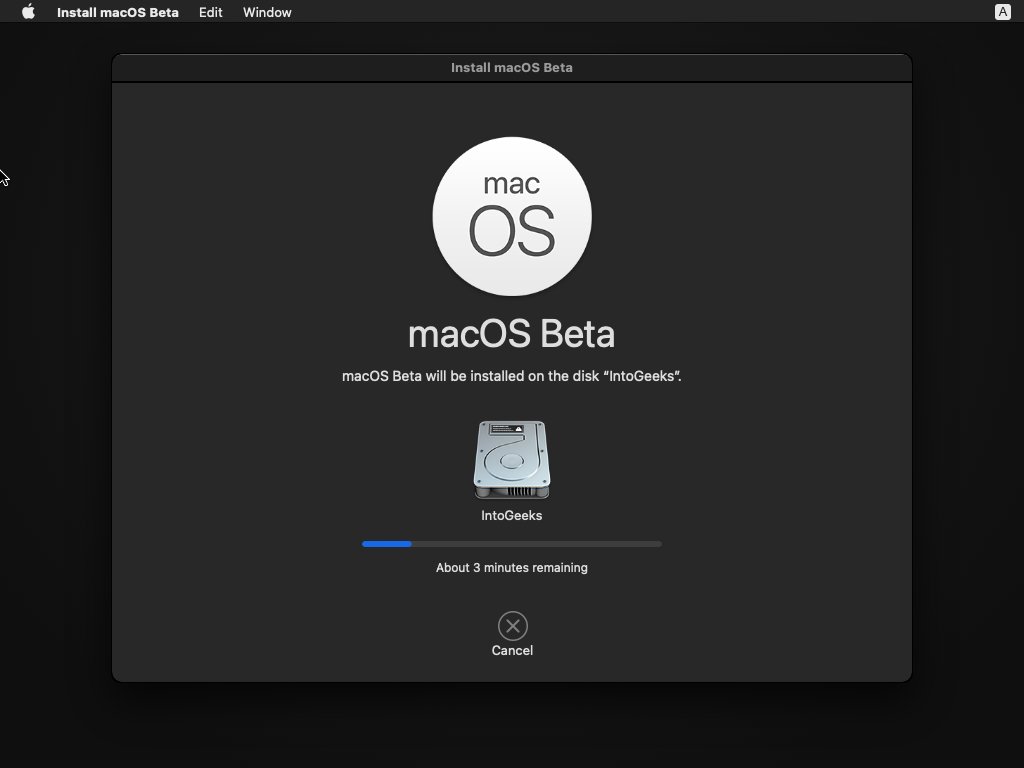
And now the macOS Big Sur starts installing on VMware on Windows PC. So, the installation may take time, and during the installation, it will start several times.
Complete the Basic Settings of macOS Big Sur
While the installation of macOS Big Sur successfully completed on VMware on Windows PC. There are only a few steps that you have to complete the basic settings in order to use the macOS Big Sur on VMware on Windows PC.
- Select your country and click continue
- Choose a keyboard layout and click continue. If you want to customize the keyboard layout, to add any other language you can add that by clicking on customize settings.
- You can turn on the accessibility options feature on macOS Big Sur. There are multiple options for accessibility such as Vision, Motor, Hearing, and Cognitive. So if you don’t want to use this feature click on the Not now option.
- Read the Data & Privacy then click continue.
- On the migration assistant page simply click on the not now option.
- You can enter the Apple ID on this window, So, there is no need to enter the Apple ID simply continue by clicking on the Set up later option.
- Click agree to agree with the terms and conditions of macOS Big Sur.
- If you want to use the express setup, so if you don’t want simply click continue.
- On the Analytics window simply click continue.
- On the Screen-time window click to set up later.
- Select the look for macOS Big Sur on VMware on Windows PC.
- And finally, the macOS Big Su is successfully installed on VMware on Windows PC.


There is a related guide to installing macOS Ventura, and macOS Monterey, on VirtualBox & VMware on Windows PC. In the below down guide links.
- How to Install macOS Big Sur Final on VirtualBox on Windows PC?
- How to Install macOS Ventura 13 on VMware on Windows PC?
- How to Install macOS Ventura 13 on VirtualBox on Windows PC?
- How to Install macOS Monterey Final on VirtualBox on Windows PC?
- How to Install macOS Monterey Final on VMware on Windows PC?
Fix macOS Big Sur screen resolution on VMware on Windows PC
Conclusion
Finally, macOS Big Sur is successfully installed on VMware on Windows PC. And the only thing just remains in this part is to use macOS Big Sur full-screen mode. And the next thing is to have the access to drag & drop feature between Windows and macOS on VMware. You can fix this issue by installing VMware Tools on macOS Big Sur.

12 Comments